ブログにサムネイル画像が必要なのはわかるけど、なかなかいい画像が見つからなくて大変…
今回は、そのような悩みを解決する方法として、
Pythonでサムネイルを自動生成する方法を紹介したいと思います。
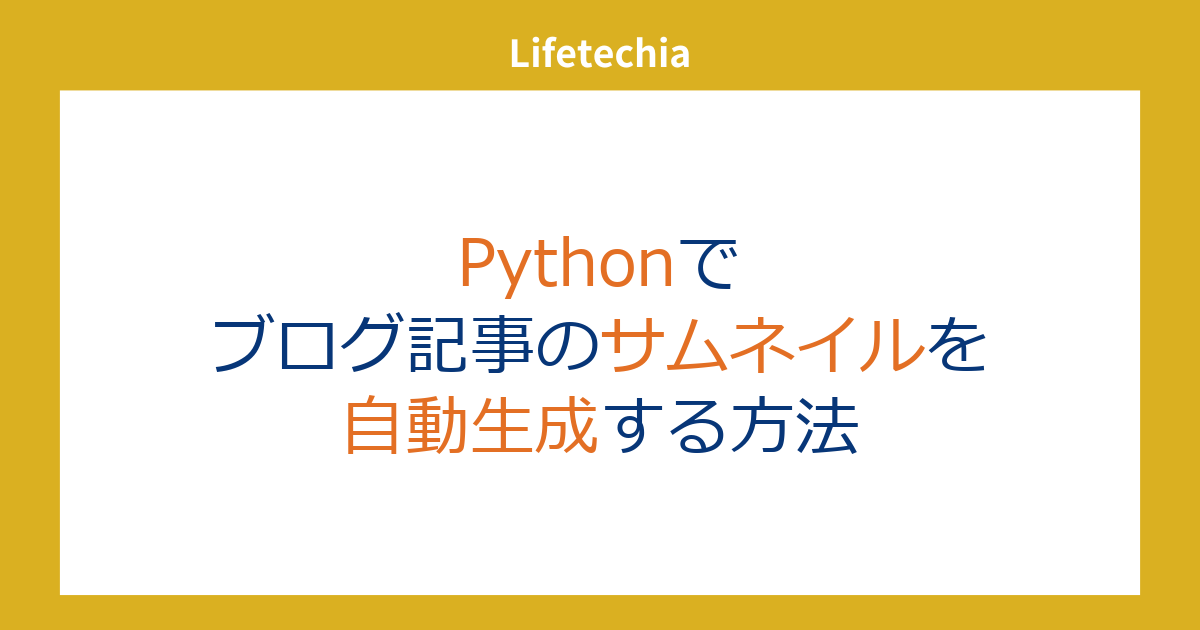
作成イメージ
今回作成するのは、ちょうどこの記事のサムネイルと同じように、ある背景にタイトルを書き込んだ画像になります。
処理の流れ
基本的な処理の流れは次のようになります。
1. タイトルを書き込むベースとなる画像を事前に用意する
2. 画像にタイトルなどを改行込みで埋め込み
3. 必要に応じて、一部の文字の色を変更
コード
from PIL import Image, ImageDraw, ImageFont


def split_text(text, parts_to_extract):
    result = []
    start_index = 0

    for part_to_extract in parts_to_extract:
        if part_to_extract in text:
            index = text.find(part_to_extract, start_index)

            if index != -1:
                before_part = text[start_index:index]
                result.append(before_part.strip())
                result.append(part_to_extract)
                start_index = index + len(part_to_extract)

    if start_index < len(text):
        after_part = text[start_index:]
        result.append(after_part.strip())

    return result

def get_size(draw, word, font):
    bbox = draw.textbbox((0, 0), word, font=font)
    width = bbox[2] - bbox[0]
    height = bbox[3] - bbox[1]
    return width, height

def add_text_to_image(base_image_path, text, output_path, color_words={}, default_color="#073678", line_spacing=20, font_path = 'meiryo.ttc',font_size = 65):
    base_image = Image.open(base_image_path)
    image_width, image_height = base_image.size
    image_with_text = base_image.copy()
    draw = ImageDraw.Draw(image_with_text)


    font = ImageFont.truetype(font_path, font_size, encoding="unic")

    lines = text.split('\n')
    y = (image_height - font_size * len(lines)) // 2

    for line in lines:
        x = (image_width - draw.textbbox((0, 0), line, font=font)[2]) // 2
        words = split_text(line, color_words.keys())

        for word in words:
            word_width, word_height = get_size(draw, word, font)
            if word in color_words:
                color = color_words[word]
                draw.text((x, y), word, fill=color, font=font)
            else:
                draw.text((x, y), word, fill=default_color, font=font)

            x += word_width

        y += font.getbbox(line)[3] - font.getbbox(line)[1] + line_spacing

    image_with_text.save(output_path)

add_text_to_image('base.png', 'Pythonで\nブログ記事のサムネイルを\n自動生成する方法', 'output.png', color_words={'Python':'#E36F24','サムネイル':'#E36F24','自動生成':'#E36F24'})
baseとなるイメージとして以下の画像を使用しました。
この画像をbase.pngとして、上記のコードを実行すると、この記事のサムネイル画像と同じものを作成できます。

コードの解説
PythonのPillowライブラリを使って画像にテキストを追加します。
1. ライブラリのインポート
from PIL import Image, ImageDraw, ImageFont
- Pillowライブラリを使って画像を操作します。
Image: 画像を開いたり保存したりするためのモジュール。ImageDraw: 画像に描画するためのモジュール(テキストや図形など)。ImageFont: フォント(文字のデザイン)を扱うためのモジュール。
2. テキストを特定の部分に分割する関数
def split_text(text, parts_to_extract):
    result = []
    start_index = 0

    for part_to_extract in parts_to_extract:
        if part_to_extract in text:
            index = text.find(part_to_extract, start_index)

            if index != -1:
                before_part = text[start_index:index]
                result.append(before_part.strip())
                result.append(part_to_extract)
                start_index = index + len(part_to_extract)

    if start_index < len(text):
        after_part = text[start_index:]
        result.append(after_part.strip())

    return result
split_text関数:- 目的: テキストを特定の単語で分割し、リストに格納します。
- 引数:
text: 入力テキスト。parts_to_extract: 分割したい部分(単語やフレーズ)のリスト。
- 処理:
parts_to_extractに含まれる単語でテキストを分割し、リストとして結果を返します。strip()は、文字列の前後の空白を取り除くために使用します。
3. テキストの幅と高さを計算する関数
def get_size(draw, word, font):
    bbox = draw.textbbox((0, 0), word, font=font)
    width = bbox[2] - bbox[0]
    height = bbox[3] - bbox[1]
    return width, height
get_size関数:- 目的: テキスト(単語)の幅と高さを計算します。
- 引数:
draw:ImageDrawオブジェクト。word: サイズを計測したいテキスト(単語)。font: 使用するフォント。
- 処理:
textbboxを使ってテキストの境界ボックスを取得し、幅と高さを計算して返します。
4. 画像にテキストを追加するメイン関数
def add_text_to_image(base_image_path, text, output_path, color_words={}, default_color="#073678", line_spacing=20, font_path = 'meiryo.ttc', font_size = 65):
    base_image = Image.open(base_image_path)
    image_width, image_height = base_image.size
    image_with_text = base_image.copy()
    draw = ImageDraw.Draw(image_with_text)

    font = ImageFont.truetype(font_path, font_size, encoding="unic")

    lines = text.split('\n')
    y = (image_height - font_size * len(lines)) // 2

    for line in lines:
        x = (image_width - draw.textbbox((0, 0), line, font=font)[2]) // 2
        words = split_text(line, color_words.keys())

        for word in words:
            word_width, word_height = get_size(draw, word, font)
            if word in color_words:
                color = color_words[word]
                draw.text((x, y), word, fill=color, font=font)
            else:
                draw.text((x, y), word, fill=default_color, font=font)

            x += word_width

        y += font.getbbox(line)[3] - font.getbbox(line)[1] + line_spacing

    image_with_text.save(output_path)
add_text_to_image関数:- 目的: 指定した画像にテキストを追加し、結果を新しいファイルに保存します。
- 引数:
base_image_path: 元の画像ファイルのパス。text: 追加したいテキスト。output_path: 結果の画像ファイルの保存先。color_words: 特定の単語に適用する色の辞書。default_color: デフォルトのテキスト色。line_spacing: 行間のスペース。font_path: 使用するフォントファイルのパス。font_size: フォントサイズ。
- 処理:
- 画像を開いてコピーを作成し、描画オブジェクトを作成します。
- フォントを指定し、テキストを行ごとに分割します。
- 各行を画像の中央に配置し、指定された色で単語を描画します。
- 結果の画像を指定されたパスに保存します。